A practical activity is a face-to-face training activity undertaken offline. Types of practical activities include:
- Competency - assessment of a person’s competence or skill
- In-Service - a workshop or training day
- Other - any other type of face-to-face training activity.
This article explains how to add, edit or delete a practical activity from your organisation's content library, known as Your Library.
Who does this article apply to?
- Users with access to Ausmed's Learning Management System
- Users with organisation manager permissions.
In this article:
Add a practical activity
Steps
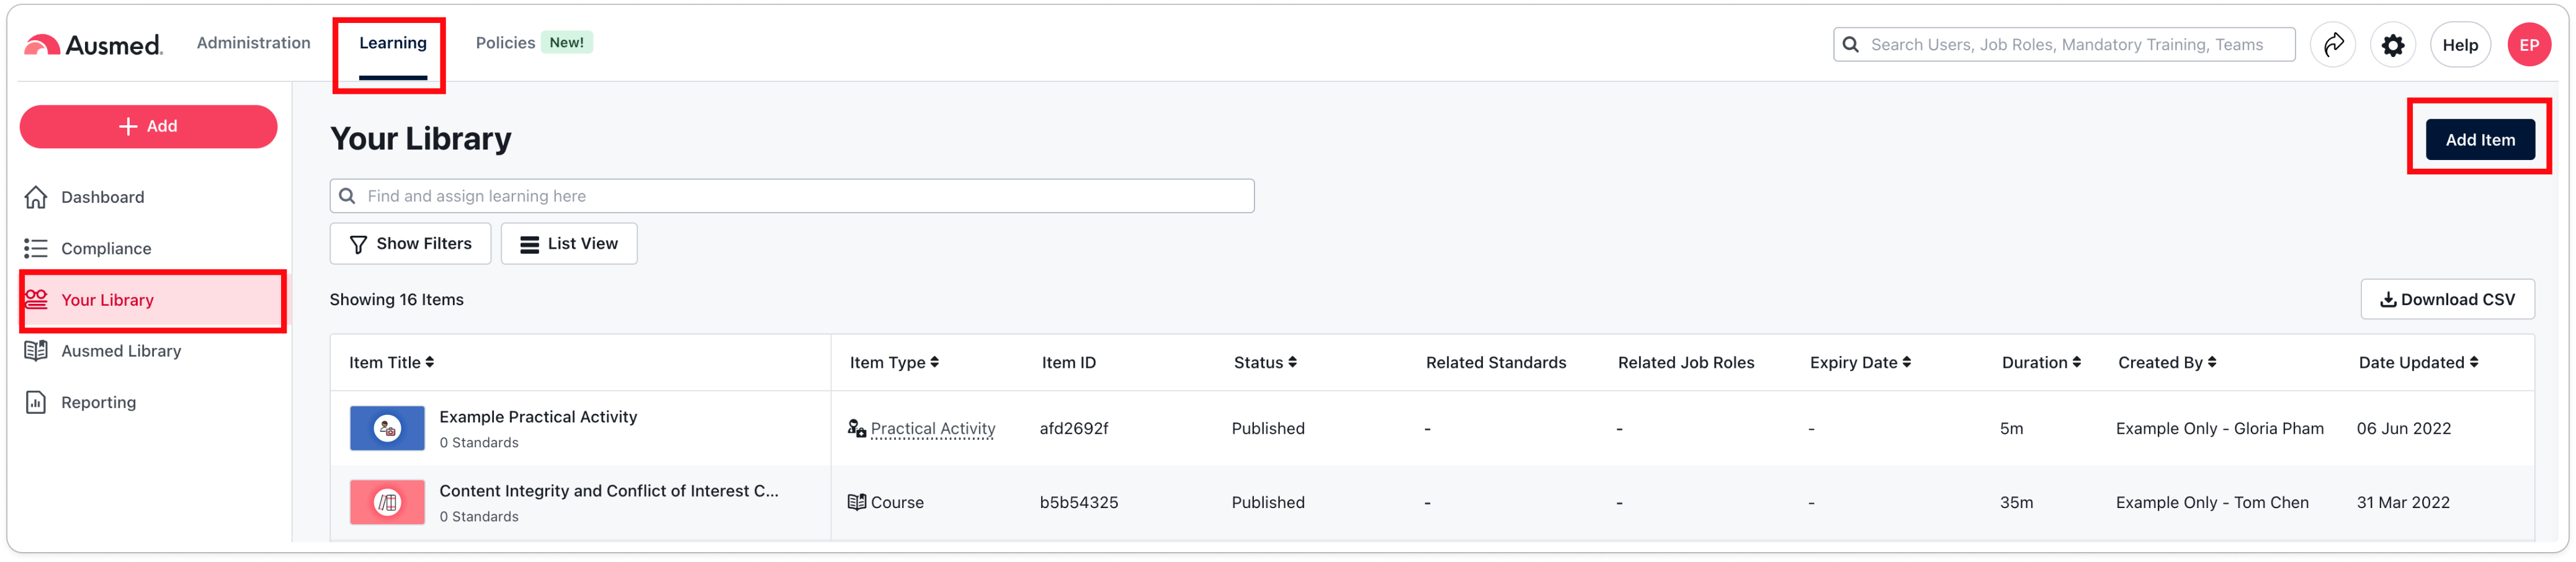
- Go to Learning in the top navigation bar of the manager portal.
- Choose one of the following options:
- From the left sidebar menu, go to Your Library; click Add Item in the upper right, then click Add Practical Activity:
- From the left sidebar menu, click the +Add button
 , then click Add Practical Activity.
- From the left sidebar menu, go to Your Library; click Add Item in the upper right, then click Add Practical Activity:
- Choose the type of activity you would like to add:
- Competency - add a competency to assess a person’s competence or skill
- In-Service - add a face-to-face in-service, workshop or training day
- Other - add any other type of face-to-face activity.
- Enter the activity information:
- Title - enter the name of the activity.
- (Optional) Item ID - enter a set of letters and/or numbers to uniquely identify the activity.
- Activity Type - update the type of activity you chose in step 3, or leave this as is.
- Duration - update the duration to reflect the approximate time you expect it will take users to complete the activity.
- (Optional) Description - enter a few sentences explaining to other users in the manager portal what the activity is about.
- (Optional) Related Topics - tag the activity to related topics for reporting purposes.
- (Optional) Related Standards - tag the activity to related standards for reporting purposes.
- (Optional) Related Job Roles - tag the activity to related job roles for reporting purposes.
- (Optional) Click Upload a Cover Photo and select an image from your computer.
Note: The cover photo appears alongside the activity in both the My Organisation portal and manager portal. Supported file types include .jpg and .png up to 1 MB, and an aspect ratio of 16:9 is recommended.
- (Optional) Set an Expiry Date for when the activity should be reviewed and updated by.
- (Optional) Update the status of the activity from Draft to Published if you would like to start using it immediately. Otherwise, leave this set to Draft.
- Click Add Item to finish:
- The activity will now be visible in Your Library
- If you published the activity in step 7, you can now start using it by:
- Adding it to a training plan
- Manually assigning it as mandatory or optional training.
Edit a practical activity
Steps
- Go to Learning in the top navigation bar of the manager portal, then to Your Library in the left sidebar menu.
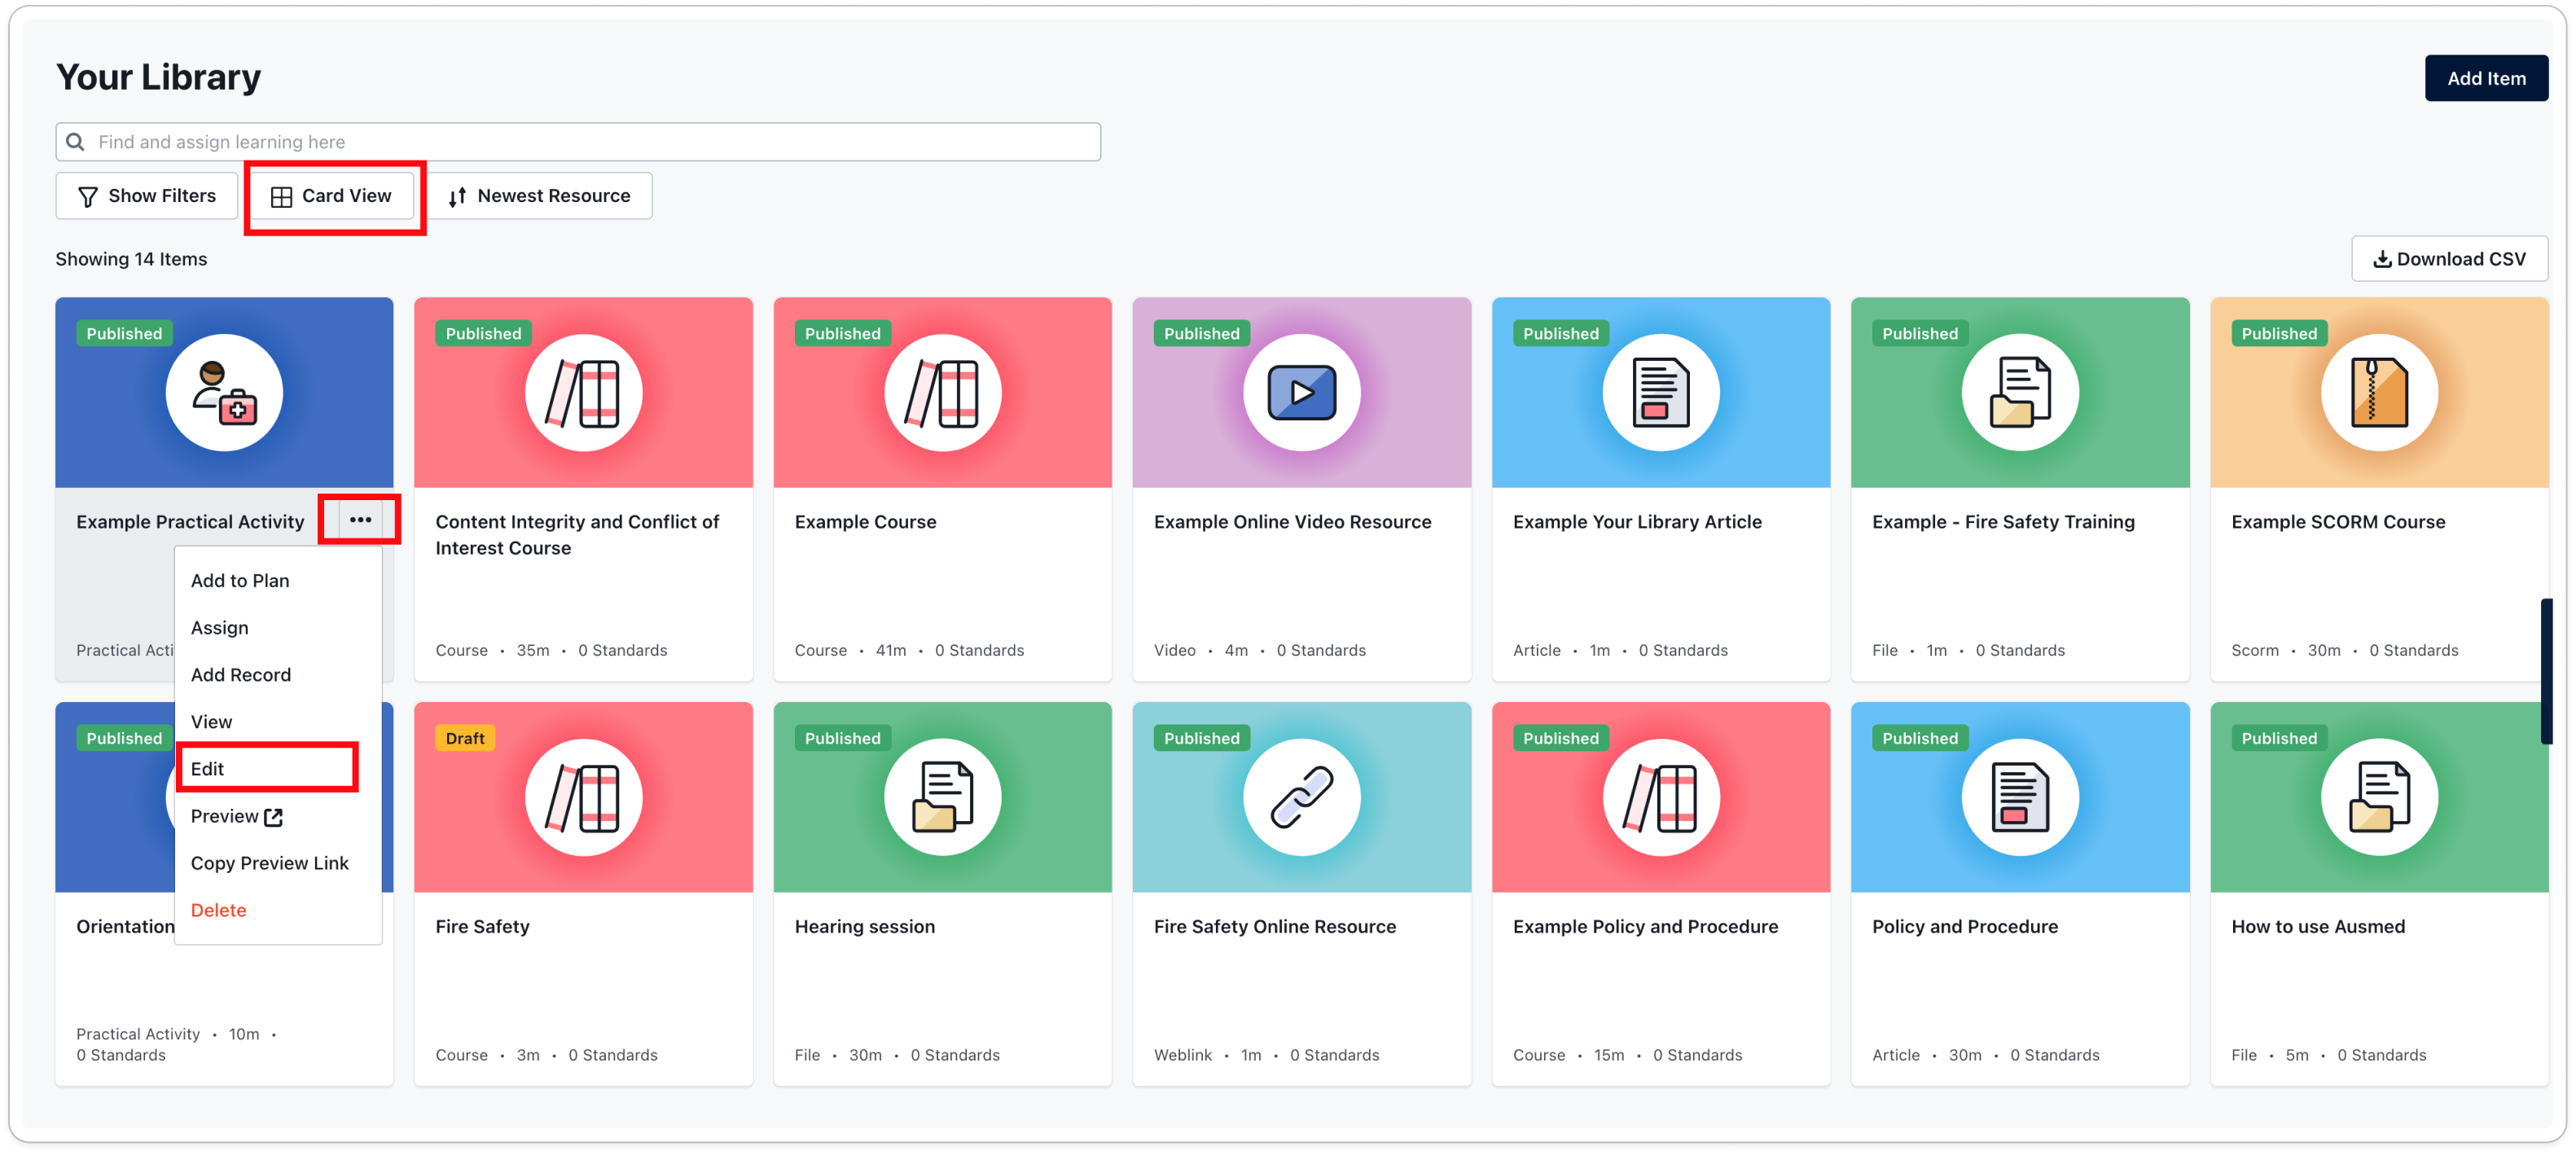
- Locate the practical activity you would like to edit, then choose one of the following options:
- Keep List View selected, then hover over the row of the activity; click the drop down menu icon
 , then click Edit:
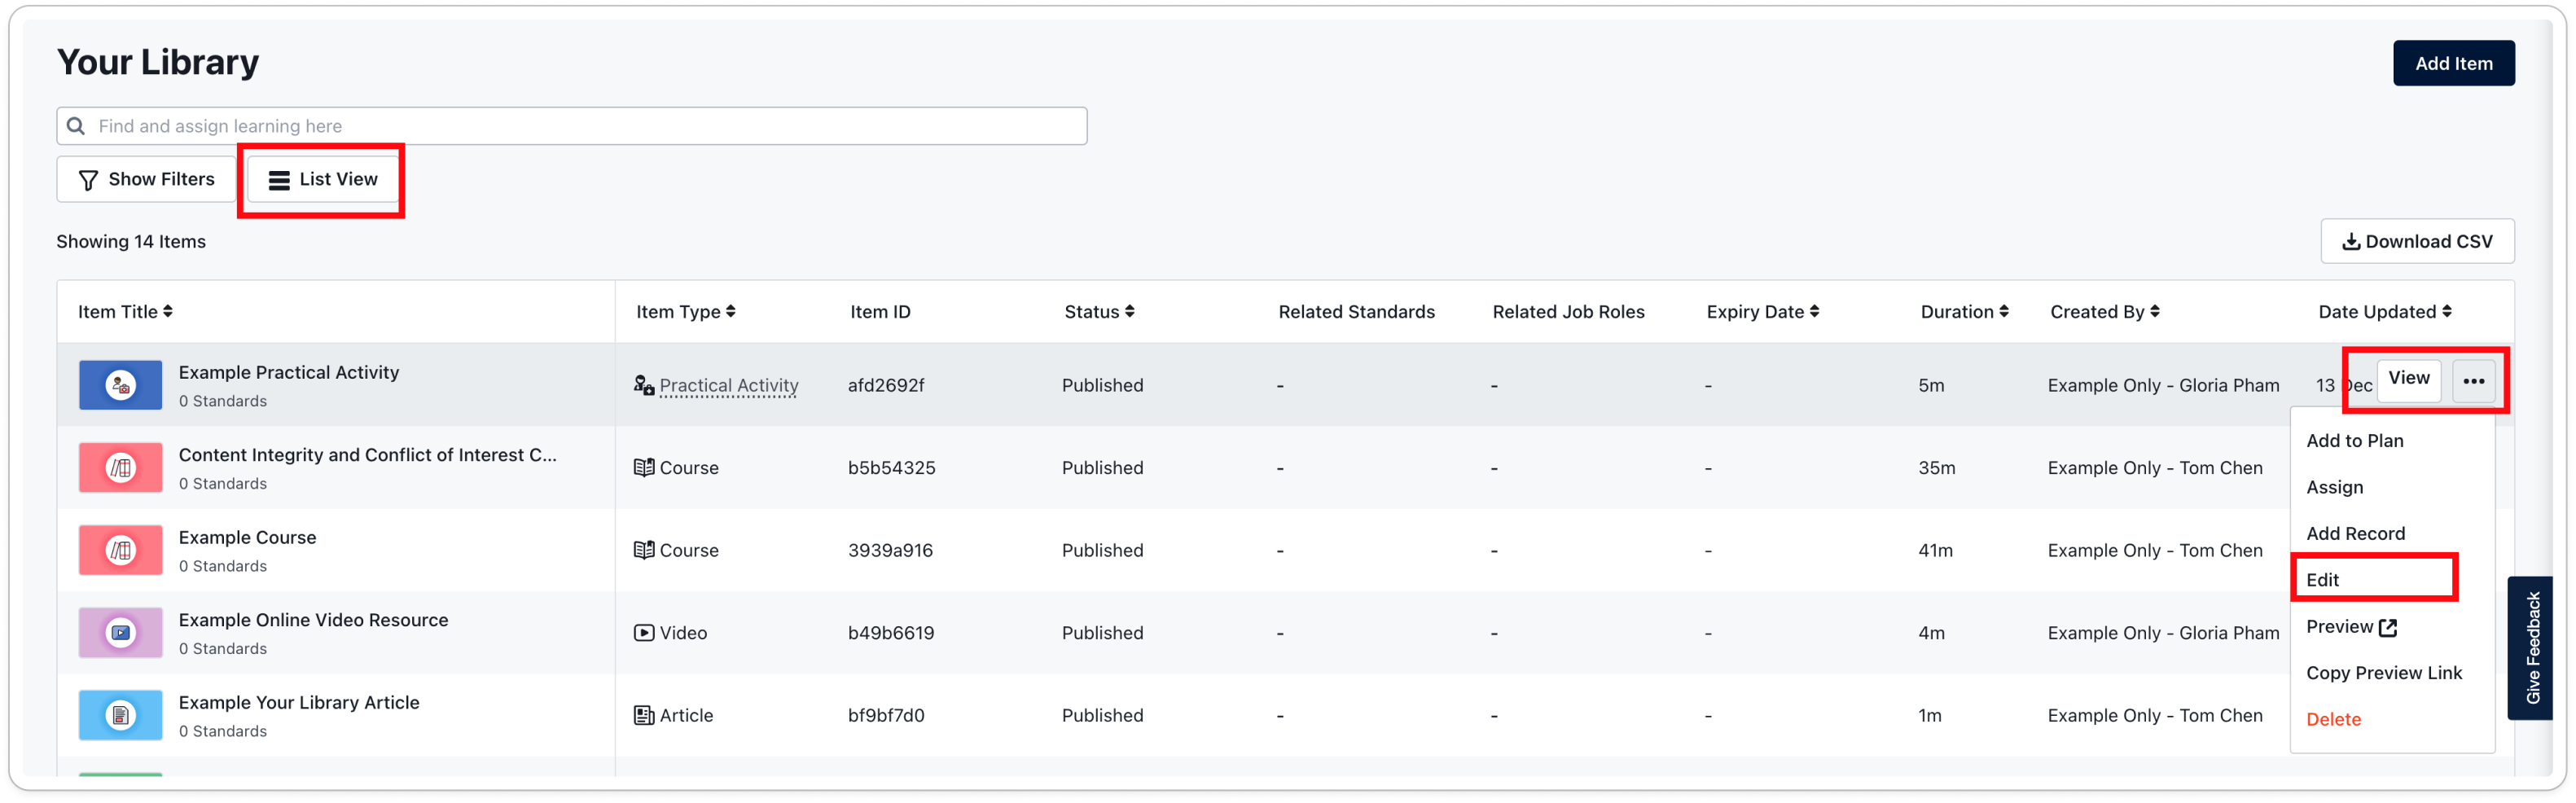
- Select Card View, then hover over the activity card; click the drop down menu icon , then click Edit:
- Click on the title of the activity in the Item Title column, then in the upper right of the item details page, click Edit:

- Keep List View selected, then hover over the row of the activity; click the drop down menu icon
- Update the activity information, which includes:
- Title - the name of the activity.
- (Optional) Item ID - a set of letters and/or numbers to uniquely identify the activity.
- Activity Type - the type of activity, which may be competency, in-service or other.
- Duration - the approximate time you expect it will take users to complete the activity.
- (Optional) Description - a few sentences explaining to other users in the manager portal what the activity is about.
- (Optional) Related Topics - the topics the activity is related to, used for reporting purposes.
- (Optional) Related Standards - the standards the activity is related to, used for reporting purposes.
- (Optional) Related Job Roles - the job roles the activity is related to, used for reporting purposes.
- Content - the information users see when they view this activity in the My Organisation portal. This information may include:
-
-
- An overview of the activity
- Learning outcomes
- Link to a registration form.
-
- (Optional) Click Upload a Cover Photo and select an image from your computer if you would like to add or replace the cover photo.
Note: The cover photo appears alongside the activity in both the My Organisation portal and manager portal. Supported file types include .jpg and .png up to 1 MB, and an aspect ratio of 16:9 is recommended.
- (Optional) Update or set an Expiry Date, which is when the activity should be reviewed and updated by.
- Update or leave the status of the activity set to Published if you would like to continue using it, otherwise set it to Draft or Unpublished if you don't need to use it.
- Click Save to finish.
- The activity will be immediately updated to reflect your latest changes.
- If the status of the activity in step 4 is set to Published, you can use it by:
- Adding it to a training plan
- Manually assigning it as mandatory or optional training. '
Delete a practical activity
Only consider deleting an activity you haven't started using yet, so you don't lose any activity records.
Steps
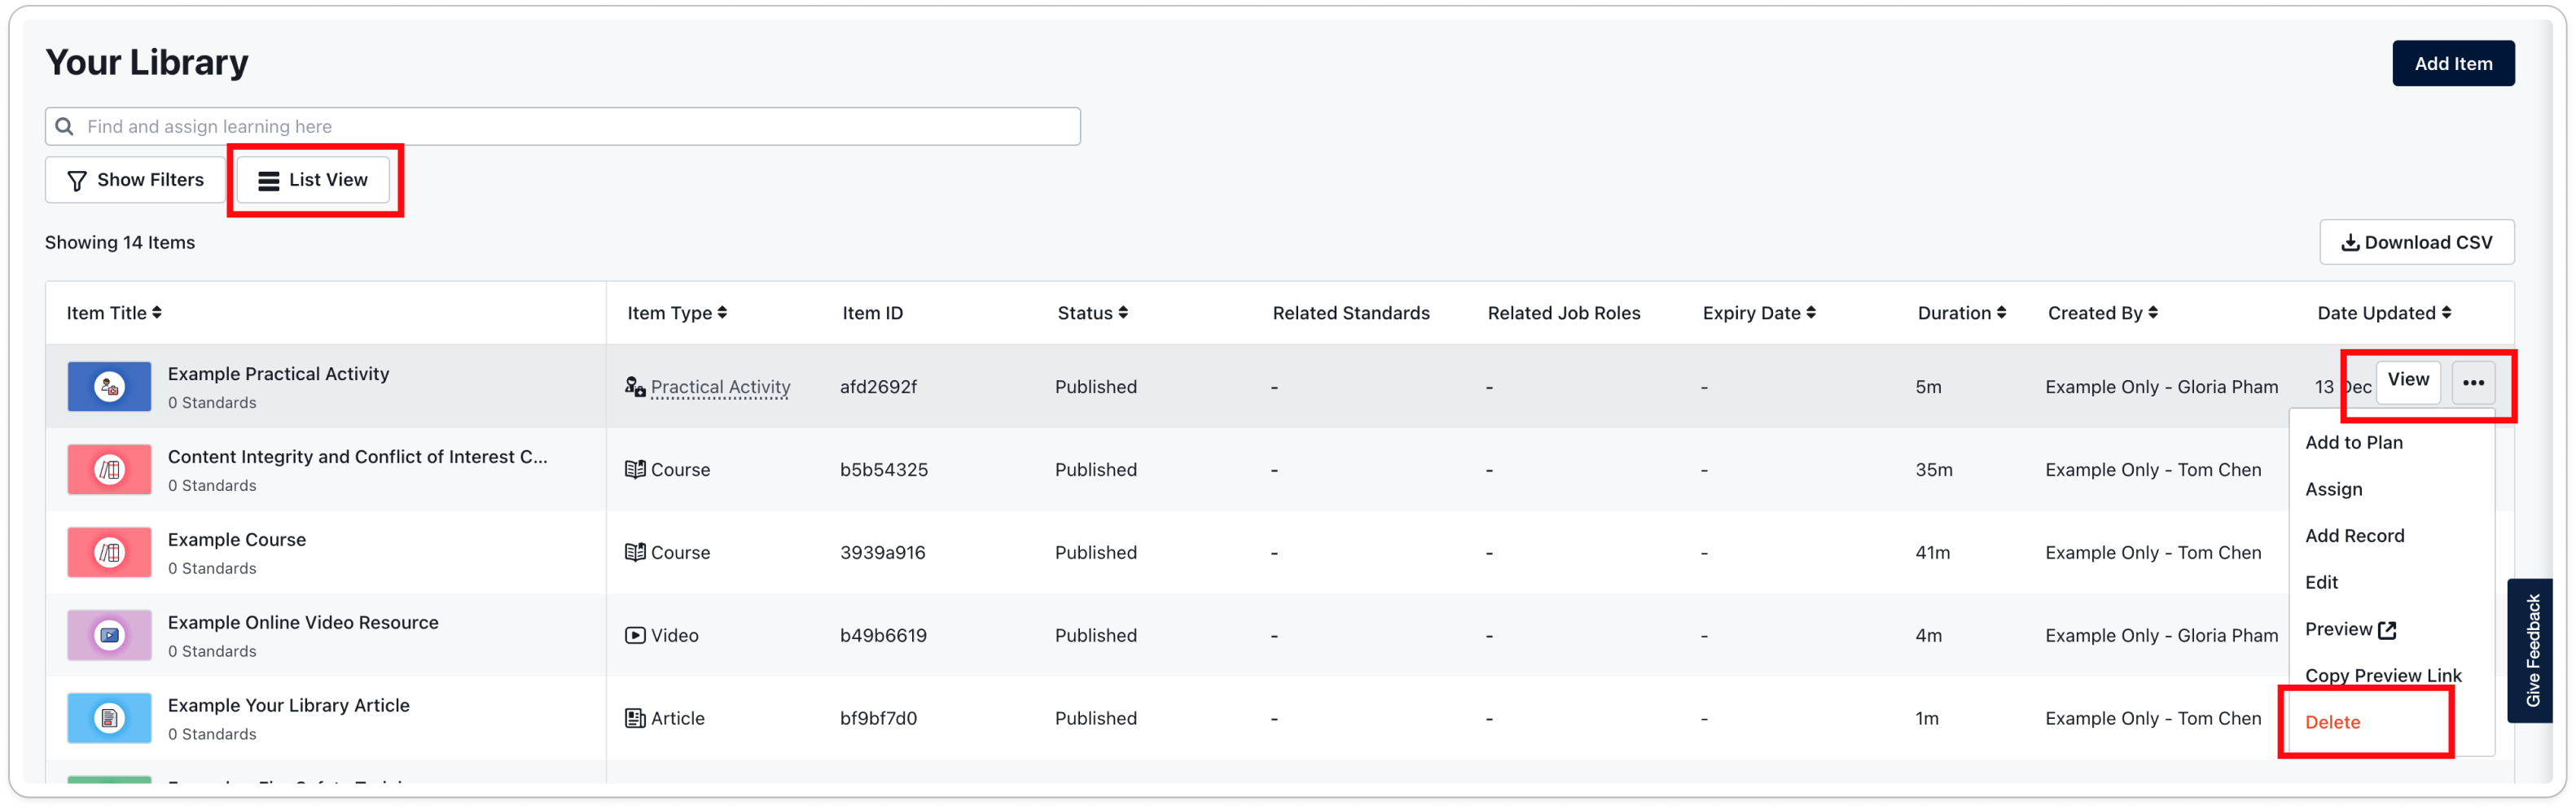
- Go to Learning in the top navigation bar of the manager portal, then to Your Library in the left sidebar menu.
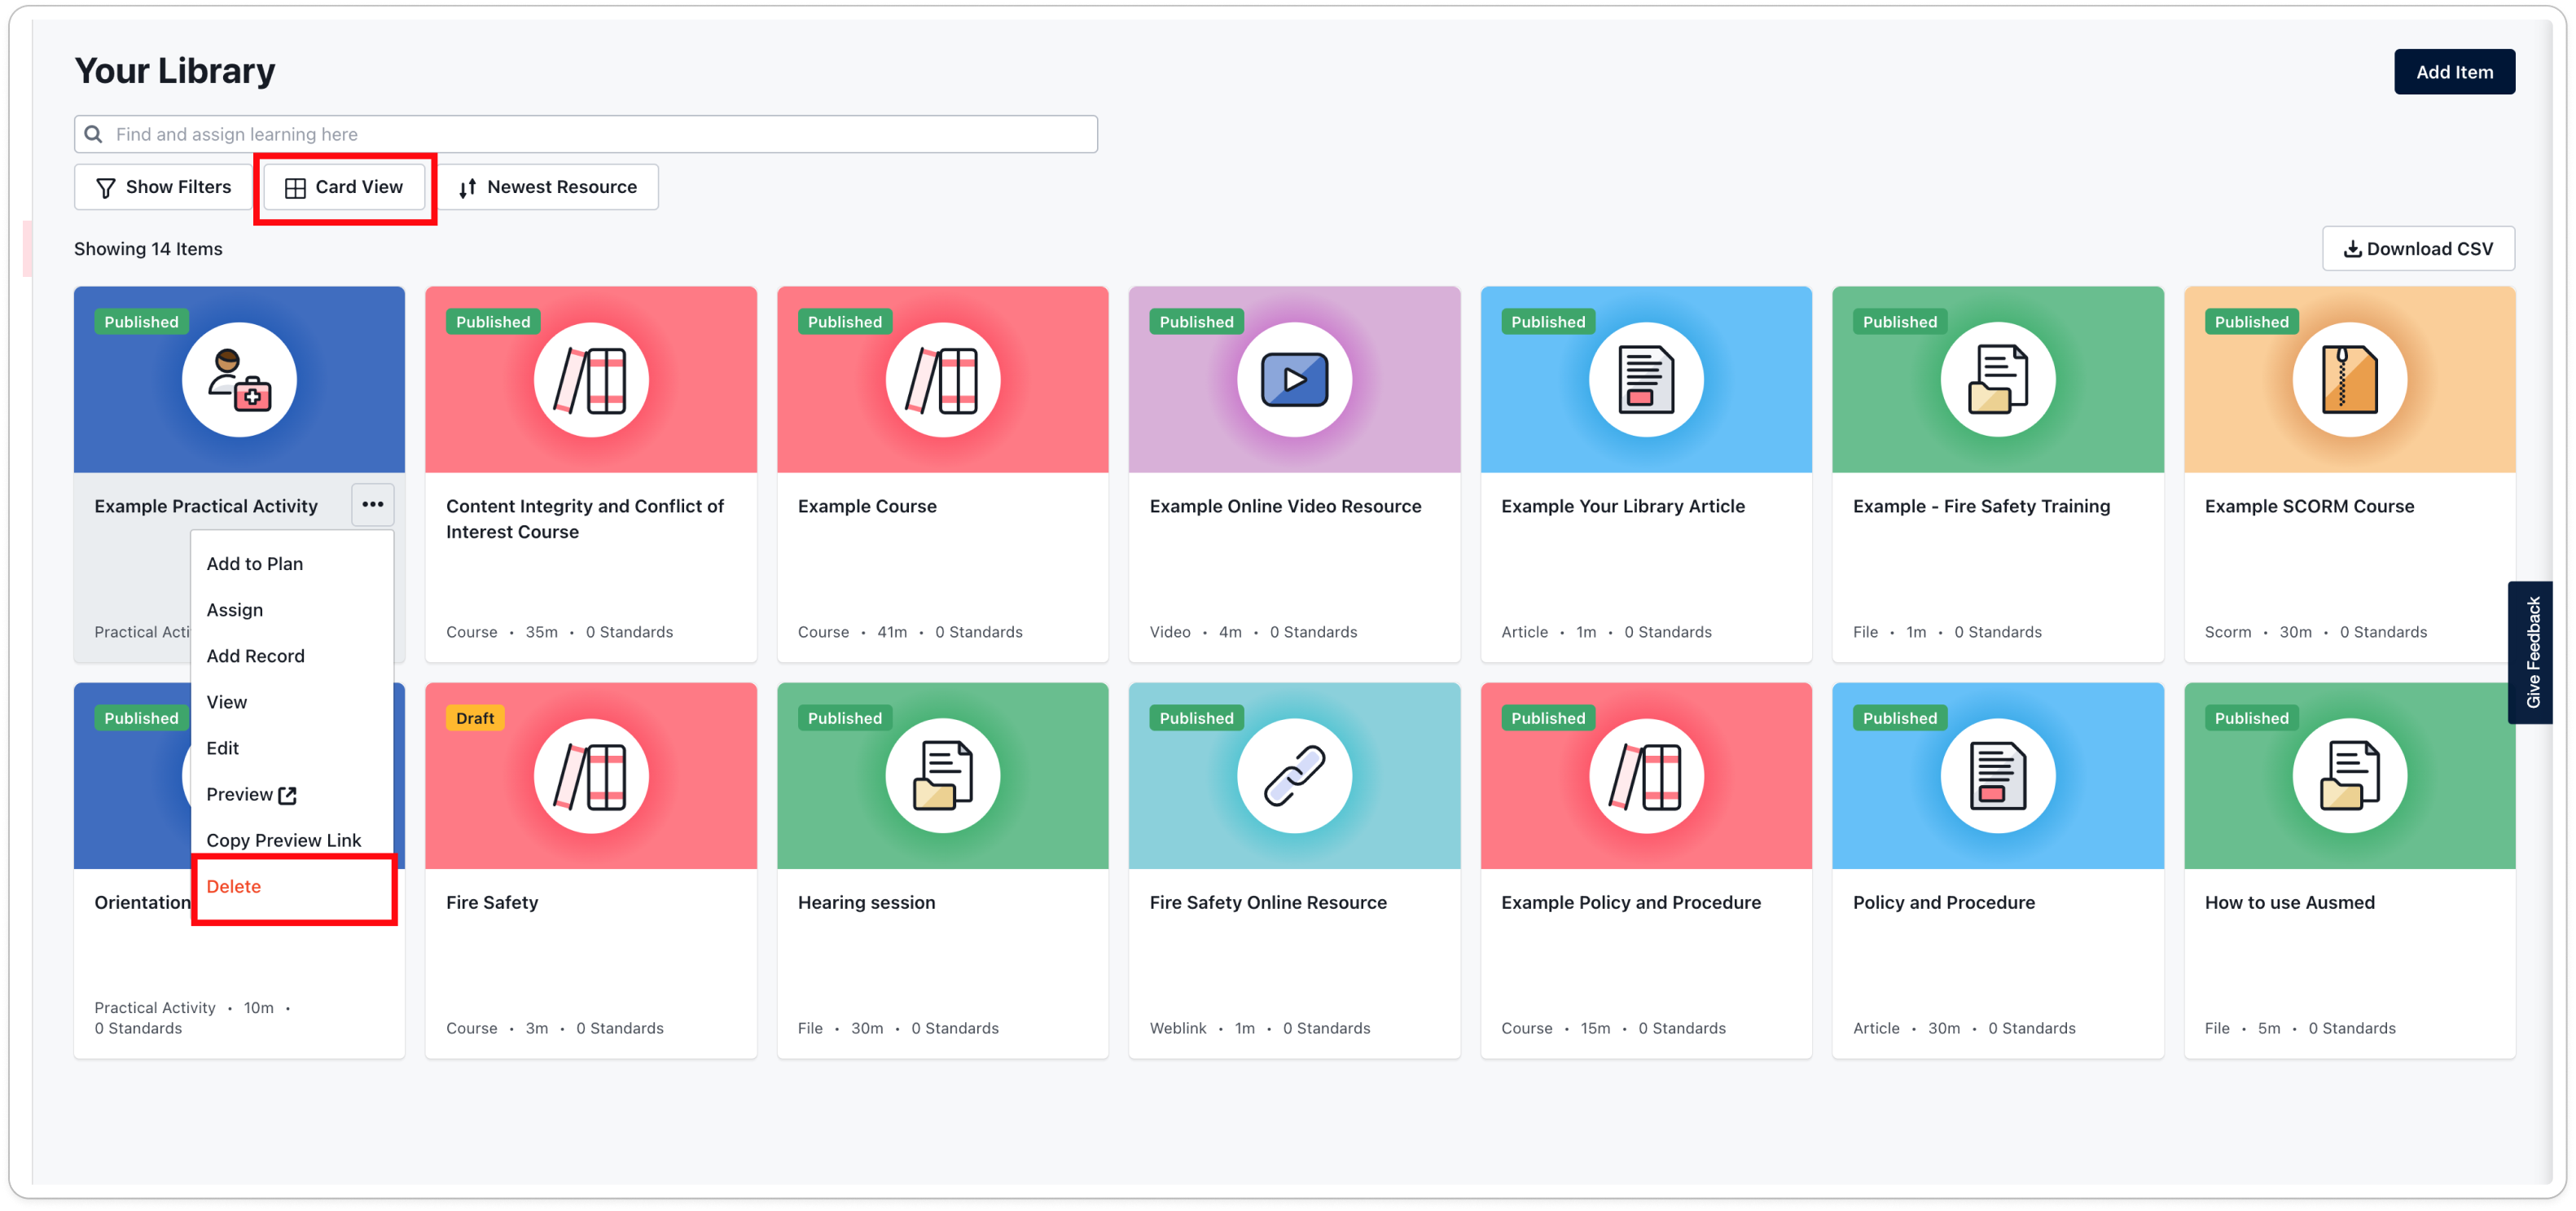
- Locate the practical activity you would like to delete, then choose one of the following options:
- Keep List View selected, then hover over the row of the activity; click the drop down menu icon , then click Delete:
- Select Card View, then hover over the activity card; click the drop down menu icon , then click Delete:
- Click on the title of the activity in the Item Title column; click the drop down menu icon in the top right of the item details page, then click Delete:

- Keep List View selected, then hover over the row of the activity; click the drop down menu icon
- Click Delete to confirm.
If you found this article helpful, let us know by selecting "Yes" or "No" below. If you require further support, please contact Manager Support.